Sunday, February 10, 2013

10 Tips For Beginner Bloggers


10 Tips For Beginner Bloggers


Blogging world is getting large everyday as so many peoples are creating blogs and it's hard for all of them to capture their targets and follow their blogging dream. So today i'am sharing few tips that might help all new bloggers:

1. Follow your niche: For every successful blogger it's important to follow your niche. Blogging is not what peoples like, It's what you like and you're good at. Before starting blogging you should figure out what you're going to blog about if you want to be a foodie blogger, a lifestyle blogger, a sporty blog, a sex blogger (yep I love them), it depends on what you like.

I love pro-wrestling so i stared a blog on Wrestling stuff and right now i got over 3k posts on it and i'am writing more posts everyday. That's the best part that you'll never get bored of posting what you're good at.

2. Choose a perfect name: A perfect blog needs a perfect name which is related to what you're blogging at. First of all never choose your name as your blog's name or address. Try to choose a name which attract Google and which is easy to remember for your fans.

Always try to choose an original name and don't copy names of other websites. I guess someone said "What's In The Name...."

3. Improve your looks: It's hard to find a perfect design for your blog but don't worry about that because you can get tons of templates for your blog by searching them on Google or you can get a simple template then customize it on your own. I mean it's just a waste of money if you're buying a premium template because free templates are as good as paid.

Choose a design according to your niche and which doesn't annoy your visitors. Because just like girls every blog wants to look sexy.

4. Writing is a must: Most importantly bloggers should focus on their content because good content is everything for your readers. Take a time to improve your writing skills and don't write like me (Believe me i do lots of mistakes). Always double check your article before posting to see your spelling and grammar mistakes.

Always give full information in your posts because sometime we just ignore something and thinks that it's a common-sense but believe me internet is full of experts and some really dumb guys.

5. Get involved in social media: Social media is a great way to earn new visitors and get in touch with old ones. Sites like facebook, twitter, youtube really helps us to earn some great traffic. Who knows maybe you become the next big thing of social media. Try to stay connected with all visitors on social networking sites.

It's important to make a facebook page for your blog and sharing your content on social media with your fans and friends.

6. Stay in touch: As i said it's good to stay in touch with your visitors and just like that it's also good to always stay in touch with your visitors by helping them and answering their comments. Maybe that visitor pay you for doing some work in their blog or maybe you find some good friends.

If your blog has a forum then make sure to participating in user posts so they think that you're interested in their activity.

7. Ask: Don't afraid of taking help of other bloggers and peoples they won't bite at all. I mean not everyone knows everything so i think it's a great idea to take some help from other bloggers and ask what you don't know.

It's never to hard to Google your problems. Well Google is the worlds best book so as our parents said "Read Books"

8. Y U NO USE MEMES: Don't just blog like a nerd mix up some memes and funny images to attract your readers. I know you're the biggest joke in the world but still you need some funny things on your posts to earn some real loyal fans.

It's not hard to find some amazing images for your blogs just Google it and you'll find tons of images.

9. Respect copyrights: Sharing content is good but don't forget to give the real owner of that content some credits. I mean he/she can claim you for using his/her content without their permissions so don't forget to respect their copyrights and give them some credits or some kind of shout-out on your blog.

Come on copy cats i know some of you guys also copy my content at-least you can post a link to my blog as a reward....Damn!!!

10. Let a life: To stay healthy and to keep your mind fresh it's really important to give yourself a little break. I mean don't spend full day in front of your PC. Go outside, have fun, hangout with your friends, date your girlfriend (Real one not online).

Sleep is important so don't forget to sleep at-least 6 hours everyday. This will keep your mind fresh and will also reminds you that there is a world outside your computer.

I hope these tips may help you in future and also i hope that after reading this you'll love to give me credits of my content you copy cats :p ....Happy blogging!!!

CSS3 Credit Card Form


CSS3 Credit Card Form


Earlier today i found this amazing CSS3 Credit Card Form. This form has been developed purely in CSS3 and does not include any images. In this article i'am sharing one Visa style form with you but there are more credit card forms and they all can be found here.

Let's get started with HTML:
<section class="credit-card visa gr-visa">
<div class="logo">Visa</div>
<form>
<h2>Payment Details</h2>
<ul class="inputs">
<li>
<label>Card Number</label>
<input type="text" name="card_number" pattern="[0-9]{13,16}" value="9842 9472 9457 9472" onclick="value=''" class="full gr-input" required />
</li>
<li class="expire last">
<label>Expiration</label>
<input type="text" name="expire_month" value="December (12)" onclick="value=''" size="10" class="month gr-input" required />
<input type="text" name="expire_year" value="2014" onclick="value=''" size="10" class="year gr-input" required />
<div class="clearfix"></div>
</li>
<li class="cvc-code last">
<label>CVC Code</label>
<input type="text" name="cvc_code" value="174" onclick="value=''" size="10" class="gr-input" required />
</li>
<div class="clearfix"></div>
</ul>
</form>
<div class="watermark">Visa</div>
</section>

After adding our html we'll add CSS coding:
/* === Basic reset === */
* { margin: 0; padding: 0; outline: none; box-sizing:border-box; }
a>img { border: none; }
header, footer, article, section, nav, aside { display: block; }
/* === General === */
body {
    font-family:Arial;
    font-size: 14px;
    background:#ddd;
}
.clearfix {
    clear:both;
}
/* === Credit Card === */
.credit-card {
    display:block;
    position:relative;
    width:93.75%;   /* This is 300px on 320px wide screen */
    max-width:500px;    /* Just to make sure that it doesnt get crazy on bg screens */
    min-width:300px;    /* And make sure that it contains at least some size */
    margin:30px auto;
    padding:20px;
    overflow:hidden;
    border-radius:6px;
    z-index:1;
}
.credit-card .inputs {
    list-style:none;
    margin-top:30px;
}
.credit-card .inputs li {
    margin-bottom:30px;
}
.credit-card .inputs li.last {
    margin-bottom:10px;
}
.credit-card .inputs li.expire {
    float:left;
    width:70%;
    margin-right:5%;
}
.credit-card .inputs li.expire input{
    float:left;
    width:35%;
}
.credit-card .inputs li.expire input.month{
    width:60%;
    margin-right:5%;
}
.credit-card .inputs li.cvc-code {
    float:left;
    width:25%;
}
.credit-card .inputs li.cvc-code input {
    width:100%;
}
.credit-card .watermark {
    position:absolute;
    z-index:10;
}
.credit-card form {
    position:relative;
    z-index:50;
}
.credit-card .logo {
    position:absolute;
    top:15px;
    right:20px;
    text-transform:uppercase;
    font-weight:bold;
}
/* === Visa === */
.visa {
    color:#fff;
    box-shadow: 0px 0px 4px rgba(0,0,0,0.8), inset 0px 1px 3px rgba(255,255,255,0.3), inset 0px 0px 2px rgba(255,255,255,0.2);
}
.visa h2 {
    text-shadow:1px 1px 2px rgba(17,121,173,0.8);
}
.visa .logo {
    color:rgba(255,255,255,0.9);
    font-size:2em;
    font-style:italic;
    text-shadow:0px 0px 3px rgba(17,123,173,0.9);
}
.visa .logo:after {
    content:' ';
    position:absolute;
    left:0px;
    top:5px;
    width: 0;
    height: 0;
    border-top: 10px solid orange;
    border-left: 10px solid transparent;
}
.visa .watermark {
    bottom:-100px;
    left:-50px;
    color:rgba(255,255,255,0.06);
    font-size:20em;
    font-weight:bold;
    font-style:italic;
}
/* === Forms === */
label {
    display:block;
    margin-bottom:8px;
    color:rgba(255,255,255,0.6);
    text-transform:uppercase;
    font-size:1.1em;
    font-weight:bold;
    text-shadow:0px 1px 2px rgba(17,123,173,0.6);
}
input {
    display:block;
    padding:12px 10px;
    color:#999;
    font-size:1.2em;
    font-weight:bold;
    text-shadow:1px  1px 1px #fff;
    border:1px solid rgba(16,103,133,0.6);
    box-shadow:0px 0px 3px rgba(255,255,255,0.5), inset 0px 1px 4px rgba(0,0,0,0.2);
    border-radius:3px;
}
input.full {
    width:100%;
}

/* === Gradients === */
.gr-visa {
    background: #1db1cf; /* Old browsers */
    background: -moz-linear-gradient(top,  #1db1cf 0%, #1078ab 100%); /* FF3.6+ */
    background: -webkit-gradient(linear, left top, left bottom, color-stop(0%,#1db1cf), color-stop(100%,#1078ab)); /* Chrome,Safari4+ */
    background: -webkit-linear-gradient(top,  #1db1cf 0%,#1078ab 100%); /* Chrome10+,Safari5.1+ */
    background: -o-linear-gradient(top,  #1db1cf 0%,#1078ab 100%); /* Opera 11.10+ */
    background: -ms-linear-gradient(top,  #1db1cf 0%,#1078ab 100%); /* IE10+ */
    background: linear-gradient(to bottom,  #1db1cf 0%,#1078ab 100%); /* W3C */
    filter: progid:DXImageTransform.Microsoft.gradient( startColorstr='#1db1cf', endColorstr='#1078ab',GradientType=0 ); /* IE6-9 */
}
.gr-input {
    background: #d3d3d3; /* Old browsers */
    background: -moz-linear-gradient(top,  #d3d3d3 0%, #d9d9d9 38%, #e5e5e5 82%, #e7e7e7 100%); /* FF3.6+ */
    background: -webkit-gradient(linear, left top, left bottom, color-stop(0%,#d3d3d3), color-stop(38%,#d9d9d9), color-stop(82%,#e5e5e5), color-stop(100%,#e7e7e7)); /* Chrome,Safari4+ */
    background: -webkit-linear-gradient(top,  #d3d3d3 0%,#d9d9d9 38%,#e5e5e5 82%,#e7e7e7 100%); /* Chrome10+,Safari5.1+ */
    background: -o-linear-gradient(top,  #d3d3d3 0%,#d9d9d9 38%,#e5e5e5 82%,#e7e7e7 100%); /* Opera 11.10+ */
    background: -ms-linear-gradient(top,  #d3d3d3 0%,#d9d9d9 38%,#e5e5e5 82%,#e7e7e7 100%); /* IE10+ */
    background: linear-gradient(to bottom,  #d3d3d3 0%,#d9d9d9 38%,#e5e5e5 82%,#e7e7e7 100%); /* W3C */
    filter: progid:DXImageTransform.Microsoft.gradient( startColorstr='#d3d3d3', endColorstr='#e7e7e7',GradientType=0 ); /* IE6-9 */
}


How To Setup Custom Domain On Blogger


Congratulations, You're reading this article probably because you bought a new domain for your blog. Using a custom domain is the best investment you can do. So in this tutorial we'll explain how to setup your custom domain on blogger.

Go To Blogger > Settings > Publishing > Click on Add a custom domain


Click on Switch to advanced settings


Now click on settings instructions


Now choose your domain type. We will use top-level domain


Now after above step this below part will appear...now you have to copy highlighted part from it. Please note that these two codes are different for every blog. So grab your own code from that page.


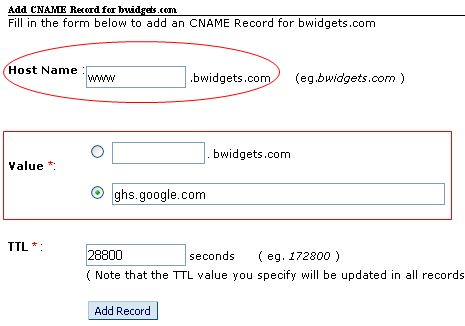
Now go to your domain provider (for example BigRock). And locate your DNS (Domain Name System) settings. Now choose CNAME records.

Add two CNAME records. In Host, Label or Name enter www and in Destination, Target or Points enterghs.google.com just like showns below:


In second CNAME enter first yellow code as Host Name and second long yellow code as Destination, Target or Points.

Now again Go To Blogger > Settings > Publishing > Click on Add a custom domain > Click on Switch to advanced settings > Enter your domain and click on save.

It's done....After this we will setup A-Records for Naked Domain Redirection (Using your domain without www. )

3 In 1 Like Box Widget For Blogger - Version 5.0


3 In 1 Like Box Widget For Blogger - Version 5.0


Previous Versions : Version 1.0 | Version 2.0 | Version 3.0 | Version 4.0


So here is last pop-up social subscribing widget of the year. It's awesome and better than all previous widgets and you can also set appear time and other features of this widget. Happy Holidays.

You can generate this widget using our widget generator :

-