Saturday, February 2, 2013

How To Add Different Background Color Or Image In Each Blogger Post


How To Add Different Background Color Or Image In Each Blogger Post

If you have multiple authors in a blog or want to make a specific post stand-out, you can make your posts to appear in different color or place a background image behind your posts.
In this tutorial i will show you how you can do this by adding some simple codes in your Blogger posts. (observation: this won't take effect if you have the read more function enabled on your blog...)


Change the color of the post background

When you create a post, switch to Edit HTML, near the Compose tab.
Add the following code just at the beginning and at the end of your post content.

<div style="background-color: #DCC368; padding: 5px 8px 5px 8px;">
Your text goes here...
</div>

  • place the red line at the BEGINNING of your post.
  • add the div tag in blue at the END of your post.
  • replace the part in green with preferred color hex value.
  • instead of "Your text here...." you will have your Post content.

It's done by wrapping your Post content into a "div" element. You can apply this setting anytime to your already published posts too or change/remove it.

Here's the example of the placed code in the Post Edit box:
blogger posts color, backgrounds, blogger tricks

Add a background image behind the Blogger post

<div style="background-image: url(IMAGE-URL-HERE); background-repeat: no-repeat; ">
Your text goes here...
</div>

  • in green, you need to place the URL address of your hosted picture (use Photobucket, Tinypic etc.)
  • in red is the line you have to place at the BEGINNING of your post.
  • in blue is the line you have to place at the END.
  • instead of "Your text here...." you have your Post content (if not, switch back to Compose tab, type your post content and then come back to edit your post)

Now click PUBLISH POST and you are done.

Recommended Post Slide Out Widget For Blogger


Recommended Post Slide Out Widget For Blogger

You know those popup messages that slide out from the bottom right corner once you’ve almost reached the bottom of the page? Well, they used to be available only on WordPress but not anymore; now Blogger users can enjoy it too! The Recommended Post slide Out Widget is an invitation to the reader to read any other post once he has read one of your blog entries. It's both useful for you (can improve your Click Through Rate (CTR) ) and for your blog visitors too.

Demo
Scroll down to the bottom of the post and you should see the Recommended Slide Out Widget appearing in the right corner of blog's page.

recommended post, widget, design


How to add the Recommended Post Slide out Widget

1. Log in into your Blogger account, then go to Design (or Layout) > Page Elements
2. Click on Add a Gadget Link
3. Choose "HTML/JavaScript" option
4. Paste this code inside the empty box:

<div id="hlslidein" style="display:none;"> <div class="help">?</div><div class="expand">+</div> <div class="close">X</div> <p>Recommended for you</p> <div id="hlslidein_image"></div> <div  id="hlslidein_title">Loading..</div> </div> <script> if(document.location.href.split("/").length==6&&document.location.href.indexOf(".html")!=-1){if(typeof hl_onload_queue=='undefined')var hl_onload_queue=[];if(typeof hl_dom_loaded=='boolean')hl_dom_loaded=false;else var hl_dom_loaded=false;if(typeof hl_async_loader!='function'){function hl_async_loader(src,callback,id){var script=document.createElement('script');script.type="text/javascript";script.async=true;script.src=src;script.id=id;var previous_script=document.getElementById(id);if(previous_script)if(previous_script.readyState=="loaded"||previous_script.readyState=="complete"){callback();return}else{script=previous_script}if(script.onload!=null)previous_callback=script.onload;script.onload=script.onreadystatechange=function(){var newcallback;if(previous_script&&previous_callback)newcallback=function(){previous_callback();callback()};else newcallback=callback;if(hl_dom_loaded){newcallback()}else hl_onload_queue.push(newcallback);script.onload=null;script.onreadystatechange=null};var head=document.getElementsByTagName('head')[0];if(!previous_script)head.appendChild(script)}}if(typeof hl_domLoaded!='function')function hl_domLoaded(callback){hl_dom_loaded=true;var len=hl_onload_queue.length;for(var i=0;i<len;i++){hl_onload_queue[i]()}}hl_domLoaded();hl_async_loader("http://ajax.googleapis.com/ajax/libs/jquery/1.7.1/jquery.min.js",function(){hl_async_loader("http://helplogger.googlecode.com/svn/trunk/Recommended Post Slide Out For Blogger Blogspot.js",function(){},"hl-out-slide")},"jQueryjs")} </script> <a href="http://helplogger.blogspot.ro/2012/06/recommended-post-slide-out-widget-for.html" target="_blank"></a>

5. Save The Widget.
6. Go to Edit HTML > Check the "Expand Widget Template" box
7. Search (CTRL + F) for the following code :

<div class='post-footer-line post-footer-line-1'>

OR

<p class='post-footer-line post-footer-line-1'>

OR

<data:post.body/>

Immediately below any of these lines, add the following snippet

<b:if cond='data:blog.pageType == "item"'>
<div style='display:none' id='bpslidein_place_holder'></div>
</b:if>

Now when the reader scrolls down to this div, the slide will open up.

8. Save your template. And that's it!

Web Hosting and Blogger


Web Hosting and Blogger


I have got many queries asking me how  I have setup the Forum here on Blogger Plugins. So I finally decided to write a tutorial on the same. Though I’m hosting the Forum on HostGator, the blog is still pointing to Google’s Robust servers. This post will be useful for those who want to continue publishing using Blogger to a Custom Domain and would like to add more features to the domain.

Prerequisites / Requirements

1. You already own a domain name and is publishing your Blogger Blog to that custom domain.
2. You want to add some extra features like Forum to your Website.
3. You are pretty sure that you are going to use a Hosting account.
4. But you still want your Blog to be managed by Blogger and the rest of it to be managed by your Webhost.

How much would it cost?

There are so many Webhosts out there each with different set of Hosting Options. I personally use HostGator. The plans and prices vary across Webhosts.
So you will have to find out the best option for you based on price and reliability.

What happens to my Blog When I buy hosting?

You can continue publishing your blog from blogger and it will still be hosted on Google’s Servers.If you do the switch intelligently , then there won’t be any down times in between the switch(don’t worry we have you covered :) ).

I’m moving to a Webhost. What should I do first?

Once you have bought a Hosting package, you will get an IP address based cPanel URL from where you can login to your Hosting Control Panel.
The very first thing that you have to do is to recreate the DNS Records.(If you don’t follow this you are going to face downtimes in between the switch). (Do not touch your domain’s Name Servers before this point).
CNAME records/ A Records can be easily created using the Advanced DNS Zone Editorin your cPanel.
This is how my DNS Record look like in the Advanced DNS zone Editor
image
You might have noticed that I’ve pointed www.bloggerplugins.org and mail.bloggerplugins.org to the Google Servers using  CNAME Alias Records. I have also created a set of 4 A Records pointing to the Redundant Google APP Server IPs.(These A records are for pointing your naked domain to the Google Servers)
If you are using Google APPs, then you will have to create the CNAMES for them as well.(mail.bloggerplugins.org was created for that purpose)/ If you are going to use the Google APPs email, then you will have to create MX Records on your Webhost.
These are the list of MX Records required for Google APP’s mail.
PriorityDestination
10ASPMX.L.GOOGLE.COM
20ALT1.ASPMX.L.GOOGLE.COM
20ALT2.ASPMX.L.GOOGLE.COM
30ASPMX2.GOOGLEMAIL.COM
30ASPMX3.GOOGLEMAIL.COM
MX Records can be created using the MX Entry tool in your cPanel.This is a screenshot of my MX entries

If your cPanel is not having the option to create CNAME/A/MX Records, you should get help from their Support team to get it done.
Once the DNS Records are created on with your Host, you can switch the Name Servers of you Domain name to that provided by your Host.
Now once you have done this, the whole domain except the one which you are aliasing to Google Servers is under the control of your Webhost (in my case everything except mail.bloggerplugins,org , www.bloggerplugins.org and bloggerplugins.org). Once that is done, you can create any number of subdomains(depending on the Host you choose) and you can install any kind of application there. I’m using bbPress on my Forum. There are many available variants, and instructions for installing them are already available on the internet.
This post is actually a general overview of how you should be handling things when you switch to a Host (and still want to publish your blog with blogger). if you are having any kind of questions do feel free to ask here in comments or via e-mail and I would be happy to help. I will try my level best to keep the tutorial updated with answers to your queries. :)

Adding an RSS feed icon to your blog, using Feedburner


Adding an RSS feed icon to your blog, using Feedburner


Feedburner's chicklets are used to add the standard "orange radar" button to your blog.  This lets readers to subscribe the RSS feed of your choice.   The information is targeted to Blogger users, but most of it applies to anyone who uses Feedburner. 


What is a Chicklet, and why you need one:


Previously I've explained how toremove the (ugly and confusing) "Subscribe to Posts (atom)" link from your blog, and why RSS / Subscribe to Posts is important to your blog andhow to create a Feedburner feed for it.

But an RSS feed is useless unless people subscribe to it.  So as well as making the feed, you also need to put something in your blog that lets your readers sign up for it.

A standard option for this is the orange square with "radar" markings on it, which many people call a "chicklet" (since it lets your viewer - the chicken? - have access to the feed you are providing).


Feedburner also has options for:
  • Using a custom icon from popular web aggregators
    I'm not sure that this is a great idea, because you don't know what feed-reader software your readers actually use, and the whole point of a feed is that you don't dictate how people see your blog.
  • Using an icon that promotes Feedburner.  This cute, but I've never seen anyone use it.

How to add a chicklet to you blog:


Log in to Feedburner, using the Google account that owns the feed.

Click on the name of the feed you want to provide a subscription tool for.

Choose the Publicize tab.

Choose the Chicklet Chooser option, from the left navigation bar.

Choose one of the options shown:  the default one is the standard-size RSS-radar-button.

Scroll to the bottom of the screen and either
  • Choose Blogger from the drop down list beside "use as a widget in", and click Go

    This takes you to a Blogger screen where you can choose which blog you want to add the gadget to (if your current login has more than one), andwhat title to use for it. 

    When this is done, click Add Widget

    This takes you to the Design > Page Elements tab, where you can drag-and-drop the widget to wherever you want it.  
    (When I tried it just now, instead of the layout screen I got a "bad request" message.  However pressing Save and then View Blog brought up the blog with the gadget showing, and I was able to go back and edit the layout later on).


What your readers see:


Your readers will see an item, wherever you put it, that looks like this:


or this:

Add to Google Reader or Homepage

or

Subscribe in
Bloglines
or something similar, depending on what option you chose from the Chicklet Chooser screen.

When someone clicks on one of these items, they are taken to either a screen where they choose which feed-reader software to add your site to (if you've used the first option), or to the specific feed-reader software.


Customising the widget code:


If you use the generic RSS button, then you may want to customise the widget code slightly:  It looks ugly not to have a space between the picture and the word "Subscribe" - and it's good to have the phrase "RSS" on the screen because that is what feed-reader-savvy people generally search for when they're looking at a site and want to find the subscribe option.  I also prefer if the subscribe action opens in a new tab/window, rather than taking the reader away from my blog.

This is quite easy to do, if you put a few line breaks in so you can see that
  • the code is actually two separate link statements
  • the first one has an image (the orange "radar bars" that it takes from Feedburner)
  • the second is a text link
  • both of them link to the RSS feed address

So it's quite easy to add a couple of extra spaces (shown as &nbsp; ), change the text as I've done below, and add   target="_blank"   to both of the links
<a href="http://feeds.feedburner.com/Blogger-hints-and-tips" rel="alternate" type="application/rss+xml" target="_blank">
<img src="http://www.feedburner.com/fb/images/pub/feed-icon32x32.png" alt="" style="vertical-align:middle;border:0"/>
</a>

&nbsp; &nbsp; &nbsp;

<a href="http://feeds.feedburner.com/Blogger-hints-and-tips" rel="alternate" type="application/rss+xml" target="_blank">

Subscribe via RSS

</a>

I generally also put the option to subscribe to my blog by email and the Feedburner FeedCount item (which shows the number of subscribers) in the same area, to give people options, and to encourage them to subscribe.

How To Import or Sync Blog with Facebook


How To Import or Sync Blog with Facebook


1) First of all login to your facebook account. At the top search bar, key in the word " RSS ". Once the menu drop down "RSS Graffiti", move your mouse over & and left click the icon. 
That  will bring you to the page of the RSS Graffiti app is located.

 CREATING PUBLISHING PLAN

2) In RSS Graffiti facebook page, look for the blue button "Add New Publishing Plan" (circled red below).  Click on it.
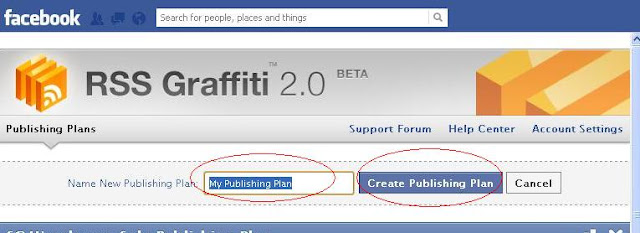
3) After you clicked the Add Publishing Plan, either you give it a title or leave it alone. Here I name it as My Publishing Plan. 
After that, click on the blue button "Create Publishing Plan ".


 ADD NEW SOURCE

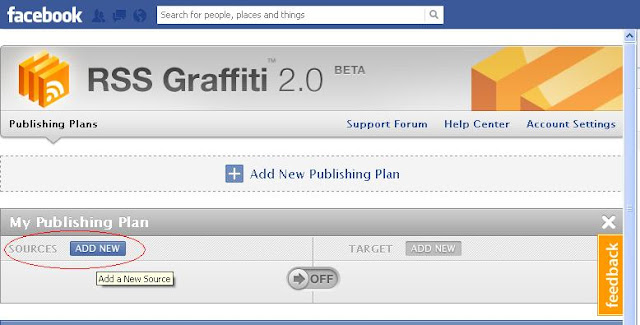
4) After you create a new publishing plan, click on the button "ADD NEW" on the left next to SOURCES. (see red circle)


5a) After that, this box "Add A New Source" pops up, key in the url address of your blog and click on button Add Source.


5b) After that is done, Feed Setup appears. Feed Title and Feed URL will automatically be filled. You can probably leave that alone. 

Click on the Save button at the bottom right.


ADD NEW TARGET

6) After that,  
click on the button "ADD NEW" on the right next to TARGET. (see red circle)


7) Choose Target, select the appropriate facebook page/group where you want your blog to sync to.
After that , click on Save Changes at the bottom.


8) Finally, turn on the publishing plan by moving the dull-colored arrow to the right. It should turn it into green color and the word ON should appear.

Its Done! In future, all you blog posts will be posted on your facebook wall.

Saying goodbye to the AdSense for Feeds blog


Saying goodbye to the AdSense for Feeds blog

Thursday, July 26, 2012 | 11:15 AM
Thanks to everyone who has been a loyal reader of this blog over the years. After some consideration, we recognize that we're just not generating enough content here to warrant your time, so we won't be posting here any longer. Thanks again for being an enthusiastic FeedBurner user.

Your stats, right away


Do you hate delays? Do you think being told to “Please wait…” by websites, cash machines, call centers, and the doughnut stand drive-thru guy in the year 2010 is a sure sign modern living isn’t quite meeting our collective expectations as a planet?

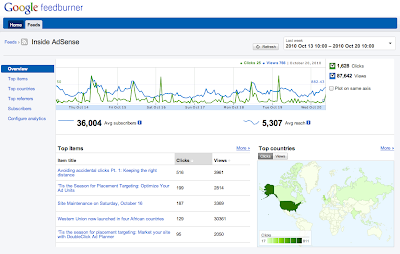
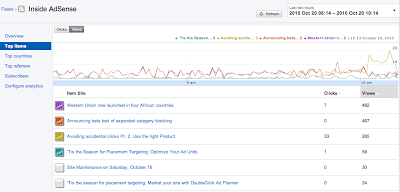
Good news! Today, we will be rolling out a new, experimental interface for Google FeedBurner. The real story is what’s new under the hood, however: the new interface provides real time stats for clicks, views, and podcast downloads, which means you can start seeing what content is drawing traffic from feed readers, Twitter, and other syndicated sources as it happens.

Additionally, if you use the FeedBurner Socialize service, and your platform uses PubSubHubbub or you ping us when you post, you can for the first time get stats on how much traffic your feed items are receiving from Twitter, as well as feed reading platforms like Google Reader in one place. Again, all within seconds of posting your content. Ping? Pong! Yep. That fast.

Your subscriber and reach numbers are still calculated based on a whole day's worth of requests, and are based on the traffic you received yesterday and before; but your item stats reflect the traffic you are receiving right now.

You can access the new interface by visiting http://feedburner.google.com/gfb/ or logging intofeedburner.google.com and then clicking on the "Try out the NEW (beta) version!" link at the top.

The best way to see these real time features is to publish a new post and then switch to the “Last two hours” view to begin seeing updates.


To access feed management or previous analytics functionality, you can continue using the original interface at feedburner.google.com.

In the new interface, we are focusing on two things: our new real-time stats presentation and getting messages about and issues with your feed posted to the top-level dashboard, so that you can better diagnose any issues that may prevent your feed from being delivered in real time. If you have any comments or questions, look for the “Send Feedback” link at the top of the page to tell us what you think.

Enabling social sharing with FeedFlare


Feed content is being constantly distributed via new channels and endpoints every day.   More and more, these new channels involve sharing your content in social networks and applications such as Facebook, Twitter and Google Buzz.

Recently, we launched our Socialize service to help you as the publisher distribute your feed via social networks, with the first network being Twitter.   If you use Blogger, you can already connect your feed to Buzz via the "connected sites" link in Buzz.

But it's equally important in the social world to make sure your subscribers can also share your feed content easily on these social networks.  FeedFlare helps enable this by allowing you to configure links in your feed that promote sharing.   You can do this by going to the Optimize tabFeedBurner and choosing FeedFlare, and then of course, adding some flare.

Now, we won't berate you for only doing the "bare minumum," nor do we recommend having "37 pieces of flare" in your feed - but we do think you should express yourself with at least a little flare that helps your subscribers move your content around these social networks a little easier.

To that end, just yesterday we enabled the official "Post to Google Buzz" FeedFlare in our catalog, which easily allows users to repost your content to Google Buzz, and then automatically updates the label with the number of times it was posted.


These links appear as so in your feed (though the exact presentation will vary depending on where your feed is being displayed):


Also included in our official catalog are "Share on Facebook" and others that may be relevant for your audience.  If you are an old time FeedBurner user, it may be time to revisit your FeedFlare setup and add some of these new ones.

In addition, if you don't see the FeedFlare you need, you can always develop one using the FeedFlare API which is documented in our FeedFlare Developer Guide.

Socializing your feed with Twitter


Sometimes you reach across the hedgerow to share with your nearby neighbors. Other times, members of the household move away and yet you can't keep from calling to remind them to wear a hat and such because it's chilly out. Today, we're celebrating acquaintances near-and-far by launching the ability to send your feed to Twitter.

FeedBurner has always been about measuring, managing, and monetizing syndicated content. Our hope is that by providing one application in which you can direct your feed in real-time to a number of endpoints, in this case Twitter in addition to the myriad feed readers, aggregators, and search engines that we have always supported, and then following on with providing analytics for measuring exactly how and where your feed gets distributed across social media, you can make better and more informed decisions about how to monetize your content.

Many of our publishers who have tried our Google Analytics feed item link integration have already noticed that their most popular feed items have been shared many times on Twitter.


We're now taking our distribution and analytics a step further by enabling the ability to automatically publish the feed items that meet your criteria to Twitter, using the Google URL shortener at goo.gl.

To get started, go to the Socialize service on FeedBurner's Publicize tab and add the Twitter account to which you would like to post items from your feed. You can take the default settings and click [Save] to start socializing immediately, or use the options we offer to customize exactly which feed items are sent to Twitter and how exactly you would like them to look. The next time you post a new item to your feed it will be sent to Twitter (as always, make sure to ping FeedBurner whenever you update your feed so this process happens as near real-time as possible).

For full details on all Socialize options, see our FeedBurner Help Center topic.


To see the results, take a look at the Twitter account in which you are sending your updates. This blog post, for instance, as well as select blog posts from this and the FeedBurner status blog, will appear from now on at http://twitter.com/feedburner. If Twitter is where you are consuming most of the latest content these days, please follow @feedburner to receive our updates in your favorite Twitter client.

"Afternoon, Frank." "Hey howdy, George."


It's about time these two neighbors got to talking to each other. Most Saturday afternoons you'd find them politely waving as they passed at each other by with their push mowers, tending to their neatly manicured tables, charts, and graphs. It just made sense that the grounds would look that much more complete if they removed a bit of fence between them. And so they've done just that.

If you use either AdSense for feeds or Google FeedBurner to track item clicks and also use Google Analytics, as of today, you will automatically start to see your feed item click analytics show up in Google Analytics with some additional information added to help you understand how distributing your feed with FeedBurner leads to traffic on your site.

Specifically, we will help you classify your links by tagging the Source as "feedburner", the Medium as the channel in which we sent out your feed such as "feed" or "email", and the Content as the actual endpoint application in which the user viewed your feed content such as "Google Reader" or "Yahoo! Mail".  In order to slice your traffic by these endpoints, in the All Traffic Sources view in Google Analytics select the "Ad Content" field in the second column.

In the coming weeks, you will start to see many more distribution endpoints in your reports. The represent ongoing additions to our database of applications that process feeds.


By default, these analytics will show up in the "All Traffic Sources" and "Campaigns" views in Google Analytics. You can filter the results just to only the traffic that comes from Google FeedBurner by filtering on "feedburner" on the All Traffic Sources page or "Feed:" on the campaigns view.  You can also use these sources in the Advanced Segments views.

In this view below, we actually have two separate feeds driving traffic to this blog, and that can  now be tracked easily in one view.


If you have item click tracking enabled, we are now automatically tagging your item URLs with Google Analytics parameters. If you're not using Google Analytics, or for some other reason don't want these parameters in the requests coming to your website, you can turn off Google Analytics tracking on the "Configure Stats" page on the Analyze tab at http://feedburner.google.com.  If you don't have item click tracking enabled, this is also the perfect time to turn it on, which can be done on this same page.


For instance, if you would rather see the detail of where your feeds are read directly, you can add ${distributionEndpoint} as the medium, and then you will get views that look something like this.


Again this will happen automatically except in one specific case:  if you are already tagging your feed item URLs with Google Analtyics tags such as "utm_source" and "utm_medium" - we have disabled this feature and you will have to turn it on manually by selecting "Track clicks as a traffic source in Google Analytics."   Note that if you do this, we will replace any existing "utm_" tags that may be in your permalinks with the values generated from FeedBurner.

In the coming weeks, we will be releasing more features in Google FeedBurner that take advantage of this functionality, so we highly recommend that you register and set up your site with Google Analytics if you haven't done so already.


AdSense policy clarification on using AdSense for feeds and AdSense for content


This is just a quick clarification on AdSense for feeds as it relates to the AdSense for Content specific policy of only allowing three ad units and three link units per page.

Many publishers have asked the question "Since feed items often get displayed with many feed items on a single web page, can using AdSense for feeds jeopardize the status of my AdSense account?"

The answer is no. Having three ad units per page is a product specific policy for AdSense for content. Product specific policies can be read about here.
In essence, the variable ways in which feed items are displayed are controlled and optimized automatically by the AdSense for feeds application and the choices you make as a publisher in your AdSense account when configuring your AdSense for feeds ad units. This means we may automatically suppress ad impressions when we detect there are too many feed ad units being displayed, resize ads based on the size and length of your content, and adjust the ads that are displayed based on the device in which the feed is being read.


AdSense for feeds now available directly in Blogger


One of the things our publishers have always asked for are ways to make it even easer to configure their blogs to work with FeedBurner and AdSense for Feeds. We're happy to announce that Blogger users, with just a few clicks, are able to do both at the same time.

Yes, this year for Halloween, AdSense for feeds is putting on a Blogger costume and allowing all Blogger publishers to easily monetize your RSS and Atom feeds directly from the Blogger interface, in the same way you set up AdSense on your blog beforehand.

To set this up, go to Blogger and select the blog you wish to monetize on your Blogger Dashboard, and select "Monetize." This will give you some basic options for configuring ads, and if you already have connected your Blogger feed to FeedBurner, will confirm that the proper feed is being configured. AdSense for feeds will automatically pick the right ad sizes for your users, content, and end medium.


After setup, you will be able to view your AdSense reports (including feed revenue) directly from the Blogger Dashboard, as well as from your AdSense account. Additional feed management options for your feed and feed analytics will be available from http://feedburner.google.com.

How to Use Facebook to Promote Your Blog


How to Use Facebook to Promote Your Blog

In this guest post, Steve Schwartz, a professional LSAT tutor, discusses how he has used Facebook to promote his Ace the LSAT blog and create a community of readers.
Your blog’s readers probably have Facebook profiles already, and making your own Facebook profile is easy enough. Aside from allowing you to create a profile and connect with your friends from elementary school, Facebook has several features that can connect your blog readers and help you find new ones.

Create a Facebook Group

Your readers have a common interest – your blog’s subject. My readers are preparing for the Law School Admissions Test (LSAT). Maybe yours are interested in knitting, running, or making money online. Just as they have subscribed to your blog, they will join your Facebook group.
At the beginning of December 2008, I created the 2009 LSAT Study / Discussion Facebook Group. Someone else had created a 2008 LSAT Group, and I wanted to be the person to create the 2009 group, so I started early. When someone is searching Facebook for an LSAT group to join this year, they’ll see my group has over 100 members, but someone else’s group on the same topic only has 3, guess which group they’ll join.
Note: I didn’t make the group about my blog directly – I made it broader. Why? So people searching on Facebook for LSAT-related groups would feel welcome to join. If they thought it was limited to my blog’s readers, the prospective member might not even visit the group page, which means he/she would never see the link to my blog.
So I created a group and placed a prominent link to my blog on the top, but it only had one member – me. Not very impressive, right? I didn’t want my readers to think my group and blog were unpopular, so I immediately invited all of my Facebook friends to join the group. Some of my Facebook friends were already planning to take the LSAT, so inviting them to join my new Facebook group had two additional benefits:
1. It informed them of my blog if they didn’t know about it already.
2. Facebook’s news feed told all their friends, making the group a viral marketing mechanism for the blog..

How Readers Use the Facebook Group

Of course, the Facebook group is more than a viral marketing mechanism too. It helps your readers to connect with each other in a way comments don’t. While comments are generally responses to your postings, Facebook’s discussion boards allow direct interaction between readers. My readers have used the Facebook group to find LSAT study partners and form study groups by posting messages on the discussion board and the Wall. How did I tell my readers about the Facebook Group? I posted a link to it on the side of my blog, and I made a brief blog post about it for those who hadn’t noticed the link.

Marketing Your Facebook Group, and Your Blog, in Other Facebook Groups

Search Facebook for groups on your topic and related ones. In each of these groups, you can post a message on the group Wall or discussion board, or you can use the Post a Link feature to notify the group’s members of your group and your blog. Warning: don’t do all three in the same group at the same time – it’s overkill and may get you banned from the group. By promoting your Facebook group at first, instead of promoting your blog, you decrease the likelihood that the group administrator will remove your message.
After doing all of this, Facebook became one of my biggest sources of traffic, and I don’t even have to do much to keep the Facebook traffic coming. In order to get more readers, you need to have a presence where they are. For me and for many bloggers these days, our present and future readers spend their time in social networking sites.
What about you? Have you used Facebook or other social networking sites to promote your blog? Have you found it to be effective?

How To Add Adsense Inside Blogger Post


How To Add Adsense Inside Blogger Post


Capture
Your adsense revenue is too less ?? here is the solution. Adding AdSense inside blogger post is the smart way to increase the visibility to get more clicks. If you add AdSense inside blogger post then ad visibility will increase and also your clicks will increase and your earning will also increase. So adding the adsense inside blogger post is the grate idea to earn more dollars from your blog.

More Ad Visibility = More Clicks = More Revenue 
Follow the simple steps to add AdSense inside blogger post.
1.We have to parse our AdSense code (parse it here)

2.Now add your parsed AdSense code here
<b:if cond='data:blog.pageType == "item"'> 
your adsense code here </b:if>
If you want to add AdSense in left side of the blogger post.
<b:if cond='data:blog.pageType == "item"'> 
<div style="float:left;">
your adsense code here </div>
</b:if>
If you want to add AdSense in right side of the blogger post.
<b:if cond='data:blog.pageType == "item"'> 
<div style="float:Right;">
your adsense code here </div>
</b:if>
3.Now go to Edit HTML and select “expand widget template”
4.Now search for (ctrl+F) <data:post.body/> (if you are using magazine type blogger template then you may found more then 1 <data:post.body/> try both and see which is correct one) and paste your code above it if you want to show ad at the top of the post else paste your code bellow <data:post.body/> to show your ads bellow the blogger post.

Add Facebook Page Into Blogger Blog


Add Facebook Page Into Blogger Blog


facebook page
Here I am going to show you how to create and add the Facebook fan page in to the blogger blog. just follow the simple steps to add Facebook fan page inside blogger blog
1. Create the Facebook page here 

2.Open that link and add all the information and add your site details and add fan page picture. 

3.Now from the admin penal go to manage and select EDIT PAGE

facebook page 2
4.Now just click on resources and in resources click on “use social plugins ” 

facebook page 3
5. Now just add the LINK of your Facebook page. (I have highlighted the place with yellow color where you need to add your Facebook fan page’s link )
facebook page 6
6. Add your Facebook LINK and set your page like this. 

facebook page 7
7. After setting your fan page widget appearance just click on Get Code.

8. Now you can see that you got 2 codes see in the figure. 

facebook page 8
9. Now login to your blogger account and go to dashboard > Design > Edit HTML and find <body> (find it using ctrl + f) 

now just below <body> paste the 1st code and save your template. 

And add the second code where you want to show your Facebook fan page. 

Don’t forget to like our page.

Automatically Add Blog Posts to Your Facebook Fan Page Wall


Update: After I posted this Notes started acting odd, so you might also looked at the NetworkedBlogs app to accomplish the same.

There are lots of plugins and apps that make it very easy to republish blog content to your Facebook personal wall, but many businesses these days are much more interested in publishing new blog posts to their Fan Pages.

There are a number of applications, both free and paid, that can help you do this, but Facebook has a built in tool that I think is the best option.

One of the native Facebook apps is something called Notes. Notes has a number of interesting uses, but if you dig just a bit you’ll discover that you can add an RSS feed as a note. When you add the Notes application to your FanPage and add your blog’s RSS feed as a new note, Facebook adds a tab that is the name of your blog and automatically updates your wall stream with the latest blog posts.

I like this approach because it’s easy and because Notes is not a 3rd party application – meaning when Facebook makes a change it will still work. I also like that it automatically updates your newsfeed when your RSS feed updates.

Here’s how to get it work for you

  1. Open your fan page (this assumes you have one)

  2. Click on the + to add the Notes Tab if you don’t have it added already

  3. Click on Notes Tab and hit Add New Note

  4. You will get a form for adding notes, but instead click on the Notes Icon above the form (See Image #1 below)

  5. From this screen you will see that you can import a blog. Add the URL to your RSS feed and hit Start Importing.(See Image #2 below)

  6. The Notes app will populate this page with your last few blog posts. Not e that a number will jump to your wall page with this first import, but from then on when you publish a new post it will show up in the stream. (See image #3 below)

Click to enlarge #1


Click to enlarge #2


Click to enlarge #3