Showing posts with label BLOGGER. Show all posts

Tuesday, February 12, 2013

How To Track Google Adsense Payment Check


How To Track Google Adsense Payment Check


Most of bloggers including me use Google Adsense to monetize their blog and earn some cash for their good work , Once your monthly earning reached to $100, Google sends the money through check on your name. Sometimes it takes a bit longer to received your check but it's not a matter if worrying because i'am gonna tell you how to track your Adsense payment check.
  • Just log in to your Adsense account
  • Enter 'my account payment history'
  • Click on the detail link of your payment
  • You can now see all of your account history payment and even the last month.
  • If you can see 'Payment Issued' then it’s on the way.
  • Note down 'Payment Number'
Here is an example of your payment statement :

According to above model of payment statement 063333333 is our Payment Number and now it's time to track it :
  • Now “Select the shipment type” and “Enter your tracking number” that you have noted before.
  • Choose Ref No. and enter your payment number after removing first '0' from it and press Go.
You can track your payment 4-5days after it was issued from Google. It took 15days for me too track my first payment so be patient and try to track daily because some times it took a little bit.

Here is an example of what you'll find after entering your Payment No.:


Tracking Payment With Waybill Number :

You can also track your payment with your Waybill number, You'll receive your waybill number after approx 15days.All Indian payments comes from Hyderabad so it takes i little bit time.

Reason for Adsense Payment Delay :

There may be many reasons why your adsense payment has been delayed. The main reason could be wrong address. In that case bluedart immediately return the check to Google. It does happen if you are receiving your first adsense check. If it happens with you, then you can Request for reissue adsense check payment. You have to wait for at list 2 weeks to get your earning credited back on your account.

I would suggest you to use bluedart location finder to find whether their service is available in your area or not. So that you can easily contact them before they return your check to Google. 

15 Tips To Avoid Google Adsense Account Ban


15 Tips To Avoid Google Adsense Account Ban


Google Adsense is a perfect way to ear thousands of dollars with your website and blogs. Even i received my first check last week of 108$. Every big company is using this service to earn large amounts from their website with this. Adsense pays you for loyal and fair clicks on their ads not for spams and cheats.

Many new bloggers get approved for Adsense but because they think it's a money machine they try to cheat it and soon they get banned from it.In this post i'am sharing 15 tips with you to avoid your Adsense from a permanent ban so read them carefully :
  1. Never use Pay-To-Click websites on your blog/site because Adsense doesn't allow you PTC click services.
  2. Don't hide Adsense ads under your site's menu , slider or between images because it will approach visitors to click on ads accidentally and you'll be get ban.
  3. Don't ask peoples to click on ads and don't even try to ask peoples on social networks like Facebook and Twitter because Adsense will detect it and it'll be not so good for you.
  4. Your blog or website must  have at least 70% search or organic traffic. If your website traffic is mainly coming from social networks  like Facebook then there is a chance that Google will deactivate your account. You can use Google Analytics to know more about your site's traffic.
  5. Publish unique content on your site because Adsense doesn't allow cheaters to copy and paste content from different sites.If you're doing then make sure to change article in your words.
  6. Never ever put Google Adsense ads on your  empty pages,contact pages or related like About me, Privacy Policy , Contact us, Form filling etc. Because Google advertisers pays you for ads on your content not on your Policy and all.
  7. All ways choose good quality key words for your blog/site and try to avoid keywords related to Hacking or Drugs.
  8. Never try cloakling  or any other black hat Search Engine Optimization.Black Hat SEO works fast but Google will  mark your website as spam.
  9. Never exchange links with other websites mainly which are  non related website.
  10. Adult content is not allowed by Adsense so don't post pornography and don't ever iFrame pornography sites. 
  11. Adsense is all you need so don't use any low-quality advert site with Adsense on your blog. Such as ClickSor and Bitvertiser..
  12. Don't write text which approach your visitors to click on ads.
  13. Never try to edit Adsense ads code or place it in fixed position.
  14. Adsense hates spam and all site related to it so don't put site links related to spam and all.
  15. Pop-Ups are annoying also Adsense hates them so don't put any pop-ups on your site to provide good quality content.

About The Author Widget For Blogger


About The Author Widget For Blogger


Wordpress provides you About The Author widget to tell your visitors about you but on the other hand Blogger gives you nothing like that but still with some editing we can create our own About The Author widget.

Installing :
  • Go To Blogger > Template > Edit HTML > Mark "Expand Widget Templates"
  • Search For ]]></b:skin> and just above it paste following css :

#ath {
background:#f8f8f8;
margin:0 0 40px 0;
padding:10px;
border: 3px outset #e8e8e8; -moz-border-radius: 10px; border-radius: 10px;
overflow:hidden;
font-size: 14px;
}
.pro {
background:#FFF !important; float:left;
margin:0 10px 0 0;
padding:4px;
border: 2px inset #e8e8e8;
}

  • Next Search for data:post.body  
  • Just below it paste the following code:

<b:if cond='data:blog.pageType == &quot;item&quot;'>
<b:if cond='data:post.author == &quot;AUTHOR NAME&quot;'>
<div id="ath">
<div>
<img class="pro" height="120" src="Your Pic URL" width="120" /><i><strong style="font-size: 18px;">Your Heading:</strong></i>
Your Description Here.Your Description Here.Your Description Here.Your Description Here.Your Description Here.Not More Word.
Join Me On: <a href="http://www.facebook.com/##########">Facebook</a>, <a href="http://www.twitter.com/##########">Twitter</a>, <a href="http://plus.google.com/##########">Google Plus</a></div>
</div>
</b:if></b:if>

  •  Save Template.
Customizing :

  • Replace AUTHOR NAME with the account name of the guest author. This name should match exactly the name appearing on his posts.
  • Replace all blue fields with your info.

jQuery Nudging In Blogger


jQuery Nudging In Blogger


This simple jQuery effect will make your simple links to dancing links and it's too easy to add this effect on your blogger with only a little bit jquery script.

Installing :
  • Go To Blogger > Template > Edit HTML
  • Just above </head> post following jquery :

<script src='http://widcraft.googlecode.com/svn/jquery.js' type='text/javascript'/>
<script type='text/javascript'>
$(document).ready(function() {
$('a.nudge').hover(function() { //mouse in
$(this).animate({ paddingLeft: '20px' },400);
}, function() { //mouse out
$(this).animate({ paddingLeft: 0 }, 400);
});
});
</script>

And save the template.

Now whenever you want to add this dancing effect to any of your links/images (either in widgets/posts), add this code (class="nudge") to the HTML "a" tag, like this:
<a href="http://www.wwefansnation.com" class="nudge">Link-Text</a>

and to use images instead of text, use this code:
<a href="http://www.wwefansnation.com" class="nudge"><img src="YourImage"/></a> 

Add A Floating Sidebar On Blogger


Add A Floating Sidebar On Blogger


You may saw this on many popular websites like Apple and Facebook and bunch of other websites and it's not that hard to get this on your blog.It's a jquery effect so make sure that your blog contain jquery script so if it does then you can skip our first and second step.

Installing :
  • Go To Blogger > Template > Edit HTML > Search for </head> 
  • Just above  </head>   paste following jquery script

<script type='text/javascript' src="http://widcraft.googlecode.com/svn/jquery.js'></script>

  • Then search any one of below codes. In custom blogger templates

<div id='rsidebar-wrapper'>

  • Or in default templates

<div class='column-right-outer'>

  • Or whatever your sidebar is just comment and i'll help you to find it Just copy the below code and paste it above the above code.

<script type="text/javascript">
        $(function() {
            var offset = $("#rsidebar-wrapper").offset();
            var topPadding = 15;
            $(window).scroll(function() {
                if ($(window).scrollTop() > offset.top) {
                    $("#rsidebar-wrapper").stop().animate({
                        marginTop: $(window).scrollTop() - offset.top + topPadding
                    });
                } else {
                    $("#rsidebar-wrapper").stop().animate({
                        marginTop: 0
                    });
                };
            });
        });
    </script>

 Customizing :

  • Replace the red colored text with the corresponding value. 
  • If you want to animate any other widget, find its class used for CSS and replace it with green colored text. If you have any doubt, let me know.
Comment for any type of help.....

6 Tips To Get Visitors To Join Your Forum


6 Tips To Get Visitors To Join Your Forum


Having a forum is easy but having an active forum is hard but today we're going to post several tips for you which should help you making your forum into a busy forum.First of all you can create a forum for your blogger by clicking here.

1.Be Active : If you want your visitors to be active on your forum then first you should be active on your own forum. Visit it everyday reply peoples solve their problem and do what a real owner should do.Try to make at least one appearance in every thread on a new forum as long as it remains feasible to do so. This will let your visitors know that you're interested in all forum activity.

2.Visit Other Forums : If you have a forum about music then be a part of other music forums around the net and promote your forum. Don't advertise your forum directly unless you are in an advertising section,but you can promo your forum as a source of your information.

If you're an active user in other forums and peoples likes your content then they'll surely want yo visit your forum.

3.Encourage Forum Members : If the members you already have are happy with your community and find it helpful, they will probably be more than willing to encourage other people to join.Talk your forum members to share your forum with others and try to make it more popular.

Give your forum community an HTML link with text to copy and paste to make sharing a link simple. Use buttons that allow them to share a forum link with various social networks as well. If a forum member mentions sharing your forum somewhere, be sure to thank them and promote them.

4.Daily Contests : Run a few contests and games in your forum to make it a more fun loving forum.Host a contest requesting meaningful posts about a specific topic, and use the voting options that come with most forums to have the community vote on the winner or start a forum sharing contest . For prizes, you can give out anything from physical items to custom forum titles.

5.Promotion Always Encourages : If your have some really cool and active members in your forum then it's your job to promote them. It'll be helpful for you to have a really good co-owner , manager or a moderator to delete all trash from your forum and make it clean.

6.Stay Spam Free : Everybody in this world hates spam and making your forum a spam free forum is a must. You see less spam = more happy users and it's your job to make your users happy. Make few moderators to clean all the trash because this will keep you both happy.

Sunday, February 10, 2013

10 Tips For Beginner Bloggers


10 Tips For Beginner Bloggers


Blogging world is getting large everyday as so many peoples are creating blogs and it's hard for all of them to capture their targets and follow their blogging dream. So today i'am sharing few tips that might help all new bloggers:

1. Follow your niche: For every successful blogger it's important to follow your niche. Blogging is not what peoples like, It's what you like and you're good at. Before starting blogging you should figure out what you're going to blog about if you want to be a foodie blogger, a lifestyle blogger, a sporty blog, a sex blogger (yep I love them), it depends on what you like.

I love pro-wrestling so i stared a blog on Wrestling stuff and right now i got over 3k posts on it and i'am writing more posts everyday. That's the best part that you'll never get bored of posting what you're good at.

2. Choose a perfect name: A perfect blog needs a perfect name which is related to what you're blogging at. First of all never choose your name as your blog's name or address. Try to choose a name which attract Google and which is easy to remember for your fans.

Always try to choose an original name and don't copy names of other websites. I guess someone said "What's In The Name...."

3. Improve your looks: It's hard to find a perfect design for your blog but don't worry about that because you can get tons of templates for your blog by searching them on Google or you can get a simple template then customize it on your own. I mean it's just a waste of money if you're buying a premium template because free templates are as good as paid.

Choose a design according to your niche and which doesn't annoy your visitors. Because just like girls every blog wants to look sexy.

4. Writing is a must: Most importantly bloggers should focus on their content because good content is everything for your readers. Take a time to improve your writing skills and don't write like me (Believe me i do lots of mistakes). Always double check your article before posting to see your spelling and grammar mistakes.

Always give full information in your posts because sometime we just ignore something and thinks that it's a common-sense but believe me internet is full of experts and some really dumb guys.

5. Get involved in social media: Social media is a great way to earn new visitors and get in touch with old ones. Sites like facebook, twitter, youtube really helps us to earn some great traffic. Who knows maybe you become the next big thing of social media. Try to stay connected with all visitors on social networking sites.

It's important to make a facebook page for your blog and sharing your content on social media with your fans and friends.

6. Stay in touch: As i said it's good to stay in touch with your visitors and just like that it's also good to always stay in touch with your visitors by helping them and answering their comments. Maybe that visitor pay you for doing some work in their blog or maybe you find some good friends.

If your blog has a forum then make sure to participating in user posts so they think that you're interested in their activity.

7. Ask: Don't afraid of taking help of other bloggers and peoples they won't bite at all. I mean not everyone knows everything so i think it's a great idea to take some help from other bloggers and ask what you don't know.

It's never to hard to Google your problems. Well Google is the worlds best book so as our parents said "Read Books"

8. Y U NO USE MEMES: Don't just blog like a nerd mix up some memes and funny images to attract your readers. I know you're the biggest joke in the world but still you need some funny things on your posts to earn some real loyal fans.

It's not hard to find some amazing images for your blogs just Google it and you'll find tons of images.

9. Respect copyrights: Sharing content is good but don't forget to give the real owner of that content some credits. I mean he/she can claim you for using his/her content without their permissions so don't forget to respect their copyrights and give them some credits or some kind of shout-out on your blog.

Come on copy cats i know some of you guys also copy my content at-least you can post a link to my blog as a reward....Damn!!!

10. Let a life: To stay healthy and to keep your mind fresh it's really important to give yourself a little break. I mean don't spend full day in front of your PC. Go outside, have fun, hangout with your friends, date your girlfriend (Real one not online).

Sleep is important so don't forget to sleep at-least 6 hours everyday. This will keep your mind fresh and will also reminds you that there is a world outside your computer.

I hope these tips may help you in future and also i hope that after reading this you'll love to give me credits of my content you copy cats :p ....Happy blogging!!!

CSS3 Credit Card Form


CSS3 Credit Card Form


Earlier today i found this amazing CSS3 Credit Card Form. This form has been developed purely in CSS3 and does not include any images. In this article i'am sharing one Visa style form with you but there are more credit card forms and they all can be found here.

Let's get started with HTML:
<section class="credit-card visa gr-visa">
<div class="logo">Visa</div>
<form>
<h2>Payment Details</h2>
<ul class="inputs">
<li>
<label>Card Number</label>
<input type="text" name="card_number" pattern="[0-9]{13,16}" value="9842 9472 9457 9472" onclick="value=''" class="full gr-input" required />
</li>
<li class="expire last">
<label>Expiration</label>
<input type="text" name="expire_month" value="December (12)" onclick="value=''" size="10" class="month gr-input" required />
<input type="text" name="expire_year" value="2014" onclick="value=''" size="10" class="year gr-input" required />
<div class="clearfix"></div>
</li>
<li class="cvc-code last">
<label>CVC Code</label>
<input type="text" name="cvc_code" value="174" onclick="value=''" size="10" class="gr-input" required />
</li>
<div class="clearfix"></div>
</ul>
</form>
<div class="watermark">Visa</div>
</section>

After adding our html we'll add CSS coding:
/* === Basic reset === */
* { margin: 0; padding: 0; outline: none; box-sizing:border-box; }
a>img { border: none; }
header, footer, article, section, nav, aside { display: block; }
/* === General === */
body {
    font-family:Arial;
    font-size: 14px;
    background:#ddd;
}
.clearfix {
    clear:both;
}
/* === Credit Card === */
.credit-card {
    display:block;
    position:relative;
    width:93.75%;   /* This is 300px on 320px wide screen */
    max-width:500px;    /* Just to make sure that it doesnt get crazy on bg screens */
    min-width:300px;    /* And make sure that it contains at least some size */
    margin:30px auto;
    padding:20px;
    overflow:hidden;
    border-radius:6px;
    z-index:1;
}
.credit-card .inputs {
    list-style:none;
    margin-top:30px;
}
.credit-card .inputs li {
    margin-bottom:30px;
}
.credit-card .inputs li.last {
    margin-bottom:10px;
}
.credit-card .inputs li.expire {
    float:left;
    width:70%;
    margin-right:5%;
}
.credit-card .inputs li.expire input{
    float:left;
    width:35%;
}
.credit-card .inputs li.expire input.month{
    width:60%;
    margin-right:5%;
}
.credit-card .inputs li.cvc-code {
    float:left;
    width:25%;
}
.credit-card .inputs li.cvc-code input {
    width:100%;
}
.credit-card .watermark {
    position:absolute;
    z-index:10;
}
.credit-card form {
    position:relative;
    z-index:50;
}
.credit-card .logo {
    position:absolute;
    top:15px;
    right:20px;
    text-transform:uppercase;
    font-weight:bold;
}
/* === Visa === */
.visa {
    color:#fff;
    box-shadow: 0px 0px 4px rgba(0,0,0,0.8), inset 0px 1px 3px rgba(255,255,255,0.3), inset 0px 0px 2px rgba(255,255,255,0.2);
}
.visa h2 {
    text-shadow:1px 1px 2px rgba(17,121,173,0.8);
}
.visa .logo {
    color:rgba(255,255,255,0.9);
    font-size:2em;
    font-style:italic;
    text-shadow:0px 0px 3px rgba(17,123,173,0.9);
}
.visa .logo:after {
    content:' ';
    position:absolute;
    left:0px;
    top:5px;
    width: 0;
    height: 0;
    border-top: 10px solid orange;
    border-left: 10px solid transparent;
}
.visa .watermark {
    bottom:-100px;
    left:-50px;
    color:rgba(255,255,255,0.06);
    font-size:20em;
    font-weight:bold;
    font-style:italic;
}
/* === Forms === */
label {
    display:block;
    margin-bottom:8px;
    color:rgba(255,255,255,0.6);
    text-transform:uppercase;
    font-size:1.1em;
    font-weight:bold;
    text-shadow:0px 1px 2px rgba(17,123,173,0.6);
}
input {
    display:block;
    padding:12px 10px;
    color:#999;
    font-size:1.2em;
    font-weight:bold;
    text-shadow:1px  1px 1px #fff;
    border:1px solid rgba(16,103,133,0.6);
    box-shadow:0px 0px 3px rgba(255,255,255,0.5), inset 0px 1px 4px rgba(0,0,0,0.2);
    border-radius:3px;
}
input.full {
    width:100%;
}

/* === Gradients === */
.gr-visa {
    background: #1db1cf; /* Old browsers */
    background: -moz-linear-gradient(top,  #1db1cf 0%, #1078ab 100%); /* FF3.6+ */
    background: -webkit-gradient(linear, left top, left bottom, color-stop(0%,#1db1cf), color-stop(100%,#1078ab)); /* Chrome,Safari4+ */
    background: -webkit-linear-gradient(top,  #1db1cf 0%,#1078ab 100%); /* Chrome10+,Safari5.1+ */
    background: -o-linear-gradient(top,  #1db1cf 0%,#1078ab 100%); /* Opera 11.10+ */
    background: -ms-linear-gradient(top,  #1db1cf 0%,#1078ab 100%); /* IE10+ */
    background: linear-gradient(to bottom,  #1db1cf 0%,#1078ab 100%); /* W3C */
    filter: progid:DXImageTransform.Microsoft.gradient( startColorstr='#1db1cf', endColorstr='#1078ab',GradientType=0 ); /* IE6-9 */
}
.gr-input {
    background: #d3d3d3; /* Old browsers */
    background: -moz-linear-gradient(top,  #d3d3d3 0%, #d9d9d9 38%, #e5e5e5 82%, #e7e7e7 100%); /* FF3.6+ */
    background: -webkit-gradient(linear, left top, left bottom, color-stop(0%,#d3d3d3), color-stop(38%,#d9d9d9), color-stop(82%,#e5e5e5), color-stop(100%,#e7e7e7)); /* Chrome,Safari4+ */
    background: -webkit-linear-gradient(top,  #d3d3d3 0%,#d9d9d9 38%,#e5e5e5 82%,#e7e7e7 100%); /* Chrome10+,Safari5.1+ */
    background: -o-linear-gradient(top,  #d3d3d3 0%,#d9d9d9 38%,#e5e5e5 82%,#e7e7e7 100%); /* Opera 11.10+ */
    background: -ms-linear-gradient(top,  #d3d3d3 0%,#d9d9d9 38%,#e5e5e5 82%,#e7e7e7 100%); /* IE10+ */
    background: linear-gradient(to bottom,  #d3d3d3 0%,#d9d9d9 38%,#e5e5e5 82%,#e7e7e7 100%); /* W3C */
    filter: progid:DXImageTransform.Microsoft.gradient( startColorstr='#d3d3d3', endColorstr='#e7e7e7',GradientType=0 ); /* IE6-9 */
}


How To Setup Custom Domain On Blogger


Congratulations, You're reading this article probably because you bought a new domain for your blog. Using a custom domain is the best investment you can do. So in this tutorial we'll explain how to setup your custom domain on blogger.

Go To Blogger > Settings > Publishing > Click on Add a custom domain


Click on Switch to advanced settings


Now click on settings instructions


Now choose your domain type. We will use top-level domain


Now after above step this below part will appear...now you have to copy highlighted part from it. Please note that these two codes are different for every blog. So grab your own code from that page.


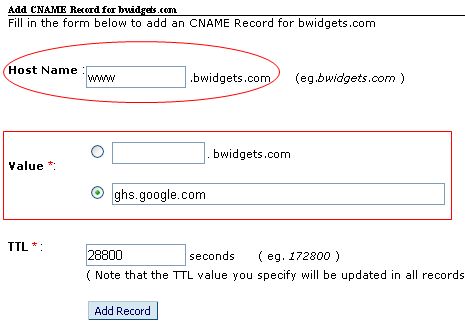
Now go to your domain provider (for example BigRock). And locate your DNS (Domain Name System) settings. Now choose CNAME records.

Add two CNAME records. In Host, Label or Name enter www and in Destination, Target or Points enterghs.google.com just like showns below:


In second CNAME enter first yellow code as Host Name and second long yellow code as Destination, Target or Points.

Now again Go To Blogger > Settings > Publishing > Click on Add a custom domain > Click on Switch to advanced settings > Enter your domain and click on save.

It's done....After this we will setup A-Records for Naked Domain Redirection (Using your domain without www. )